FLUX 2 Tutorial: Image Generation and Editing Guide for AI FILMS Studio

Share this post:
FLUX 2 Tutorial: Image Generation and Editing Guide for AI FILMS Studio
FLUX 2, built by Black Forest Labs, is a 32 billion parameter image generation system capable of multi reference editing, 4 megapixel output, exact hex color matching, and reliable text rendering. AI FILMS Studio integrates eight FLUX model variants covering everything from fast text-to-image generation to custom LoRA fine tuning.
This guide walks through each FLUX model available on the platform, with specific parameters, prompt examples, and workflows you can use immediately.
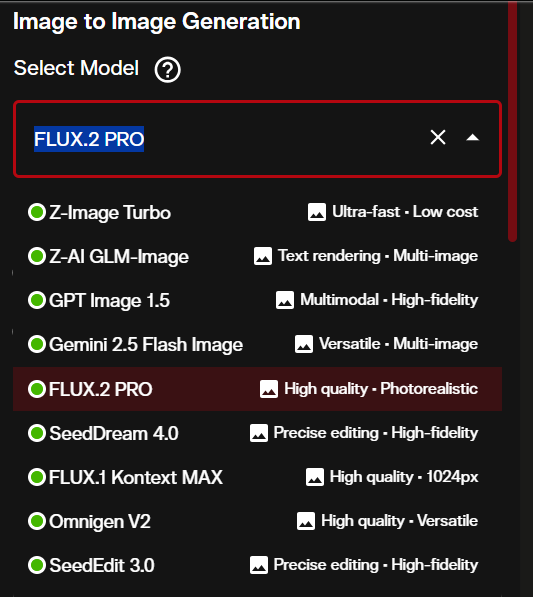
FLUX Models Available on AI FILMS Studio
AI FILMS Studio offers six FLUX variants through the image workspace. Each targets a different use case.
| Model | Task | Best For |
|---|---|---|
| FLUX.1.1 PRO Ultra | Text to Image | Highest quality production images |
| FLUX.1 LoRA | Text to Image | Custom style generation with trained weights |
| FLUX.1 Kontext Max | Image to Image | Editing existing images, style transfer |
| FLUX.1 LoRA Fast Trainer | Model Training | Training custom LoRA weights on your images |
| FLUX.2 Dev | Text to Image | Fast experimentation with acceleration modes |
| FLUX.2 Pro | Text to Image | Production grade images, static banners, marketing art |
| FLUX.2 PRO Edit | Image to Image | Multi reference editing with up to 10 source images |
| FLUX.2 Klein 9B Edit | Image to Image | Fast editing from 1–3 reference images with natural language |
All models are accessible from the image generation workspace at /workspace?g=image.
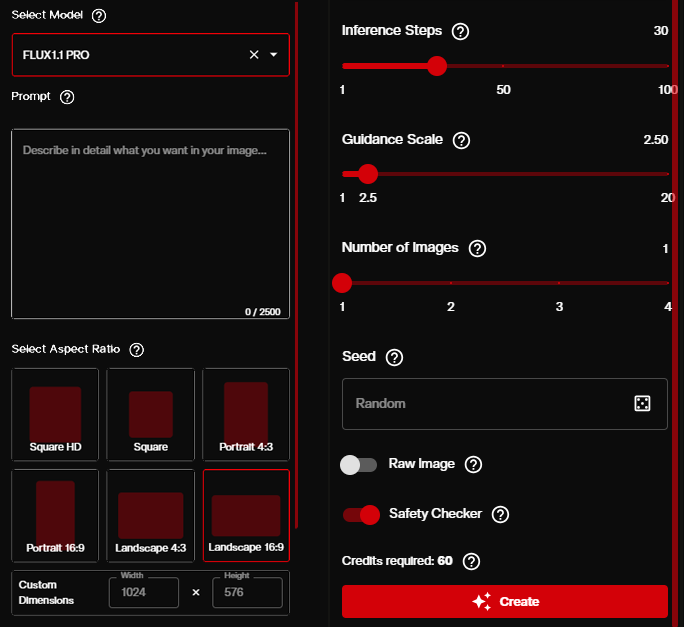
Text-to-Image with FLUX.1.1 PRO Ultra
FLUX.1.1 PRO Ultra delivers the highest fidelity outputs across the FLUX family. Use this when quality matters more than speed.
Step 1: Open the Image Workspace
Navigate to AI FILMS Studio and select FLUX.1.1 PRO Ultra Text to Image from the model dropdown.
Step 2: Configure Parameters
Set these parameters before generating:
- Prompt: Describe your image in detail (up to 2,500 characters). FLUX responds well to structured descriptions covering subject, setting, lighting, and style.
- Aspect Ratio: Choose 16:9 for landscape, 1:1 for square, or 9:16 for portrait.
- Guidance Scale: Controls how closely the output follows your prompt. Default is 2.5. Higher values (5-10) produce more literal interpretations. Lower values allow more creative variation.
- Inference Steps: Default 30. More steps (up to 100) increase detail but slow generation. For drafts, 15-20 steps work well.
- Output Format: PNG for maximum quality, JPEG for smaller file sizes.
Step 3: Write Your Prompt
FLUX is really good at structured, descriptive prompts. Here are examples you can copy and modify:
Product Photography:
Professional product photo of a ceramic coffee mug on a marble countertop,
morning light from left window, shallow depth of field, brand color #2D5F8A
on the mug body, steam rising from black coffee, 8K detail
Character Portrait:
Cinematic portrait of a woman with silver hair wearing a dark blue leather jacket,
neon city background at night, volumetric fog, rim lighting from behind,
photorealistic skin texture, shot on 85mm lens f/1.4
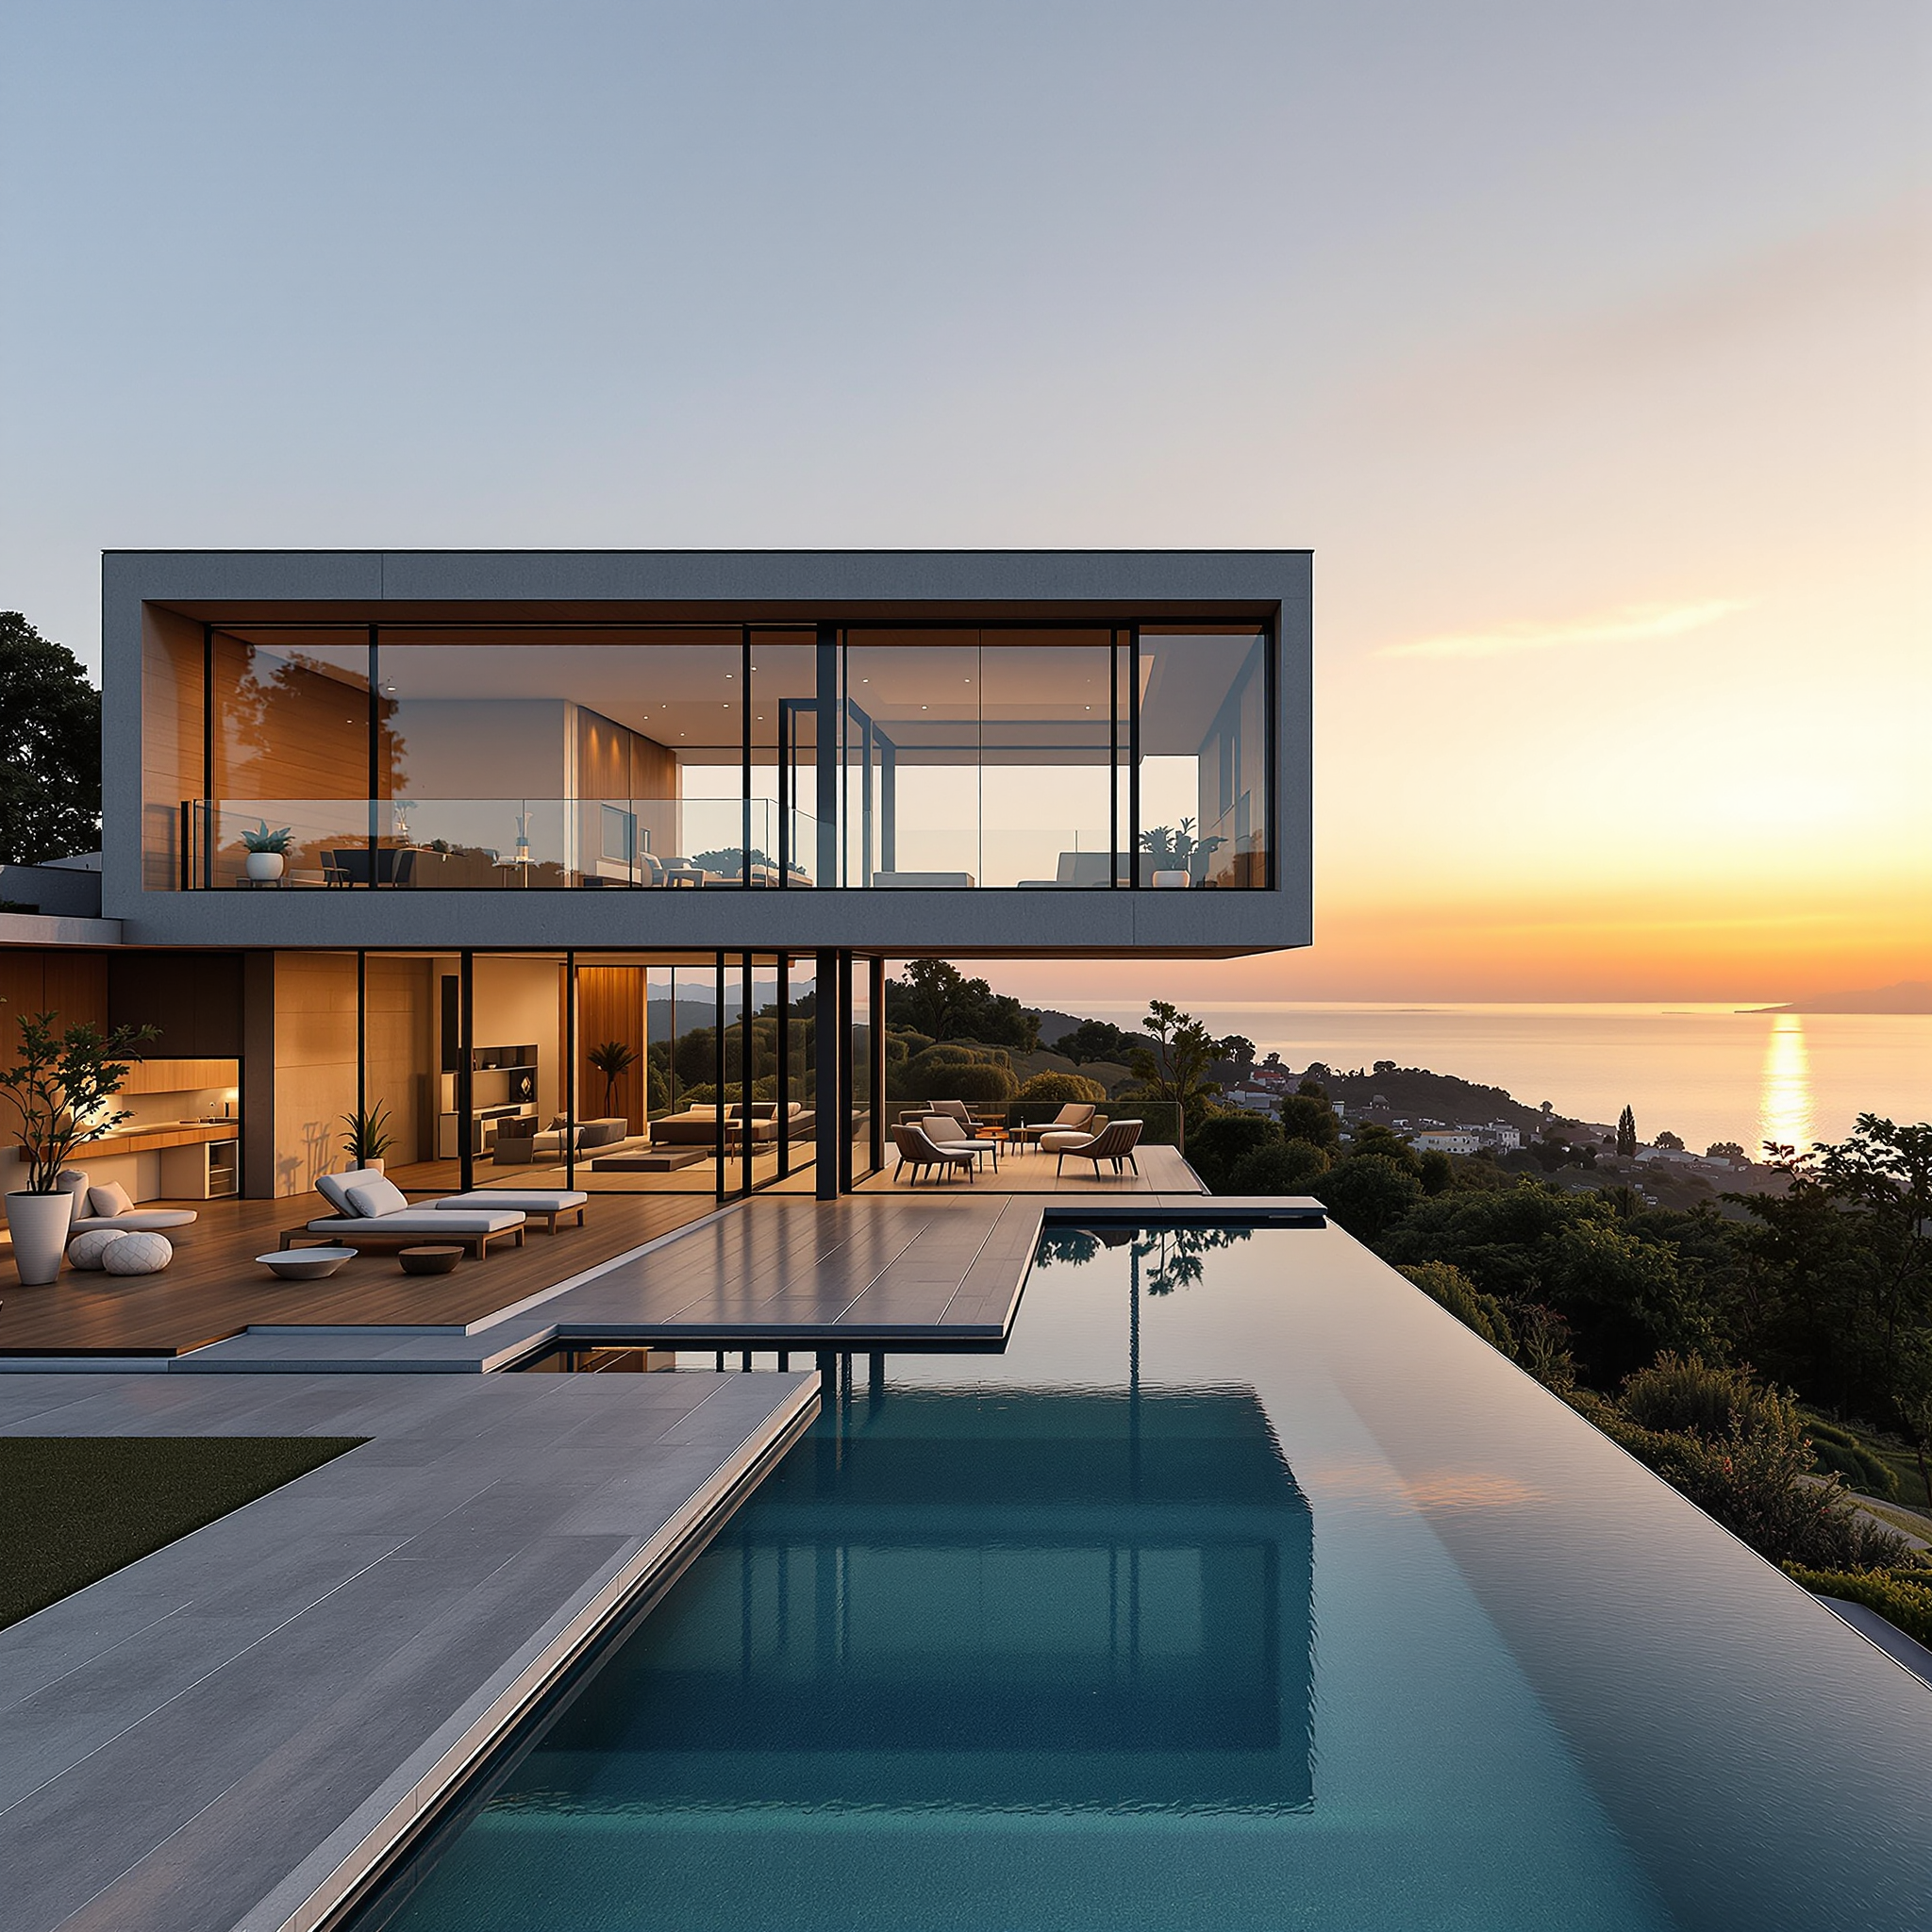
Architectural Visualization:
Modern minimalist house exterior at golden hour, floor-to-ceiling glass walls,
concrete and wood materials, infinity pool reflecting sunset,
drone perspective at 45 degree angle, architectural photography style
UI Mockup with Text:
Mobile app login screen design, dark theme with gradient background from
#1a1a2e to #16213e, white text reading "Welcome Back" at top,
email and password input fields, blue login button with text "Sign In",
clean minimal interface, Figma style mockup
Step 4: Generate and Iterate
Click Generate. Each image takes under 10 seconds. Review the output and adjust:
- If the image is too literal, lower the guidance scale.
- If details are missing, increase inference steps.
- If composition is wrong, rephrase your prompt with more spatial direction.
You can generate up to 4 images per request to compare variations.
Text-to-Image with FLUX.2 Dev
FLUX.2 Dev is the latest generation model with three speed modes. It supports prompt expansion (automatic prompt enhancement) and WebP output format.
Acceleration Modes
| Mode | Speed | Quality | Use Case |
|---|---|---|---|
| None | Standard | Maximum detail | Final production images |
| Regular | Faster | Minor quality tradeoff | Iterating on compositions |
| High | Fastest | Draft quality | Quick concept exploration |
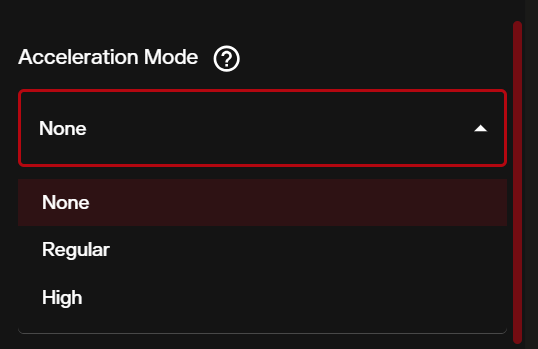
Unique Parameters
- Acceleration: Choose None, Regular, or High. Start with Regular for a good balance.
- Enable Prompt Expansion: When toggled on, the model automatically enriches short prompts with additional detail. Useful for quick ideation. Turn off for precise control.
- Inference Steps: Capped at 50 for FLUX.2 Dev (versus 100 for older variants). Default is 28.
- Output Format: Supports JPEG, PNG, and WebP.
Prompt Examples for FLUX.2 Dev
Cinematic Still:
Wide establishing shot of an abandoned space station orbiting a gas giant,
interior lights flickering through cracked viewports, debris field in foreground,
volumetric god rays through atmosphere, concept art for science fiction film
Fashion Editorial:
Editorial fashion photograph, model wearing structured oversized coat in charcoal gray,
standing in empty white gallery space, dramatic side lighting creating long shadow,
shot from low angle, high contrast black and white with selective color on red lipstick
Environment Concept:
Underwater ancient city ruins, bioluminescent coral growing on stone columns,
school of translucent jellyfish drifting through arched doorway,
shafts of blue-green light from surface above, detailed matte painting style
Text-to-Image with FLUX.2 Pro
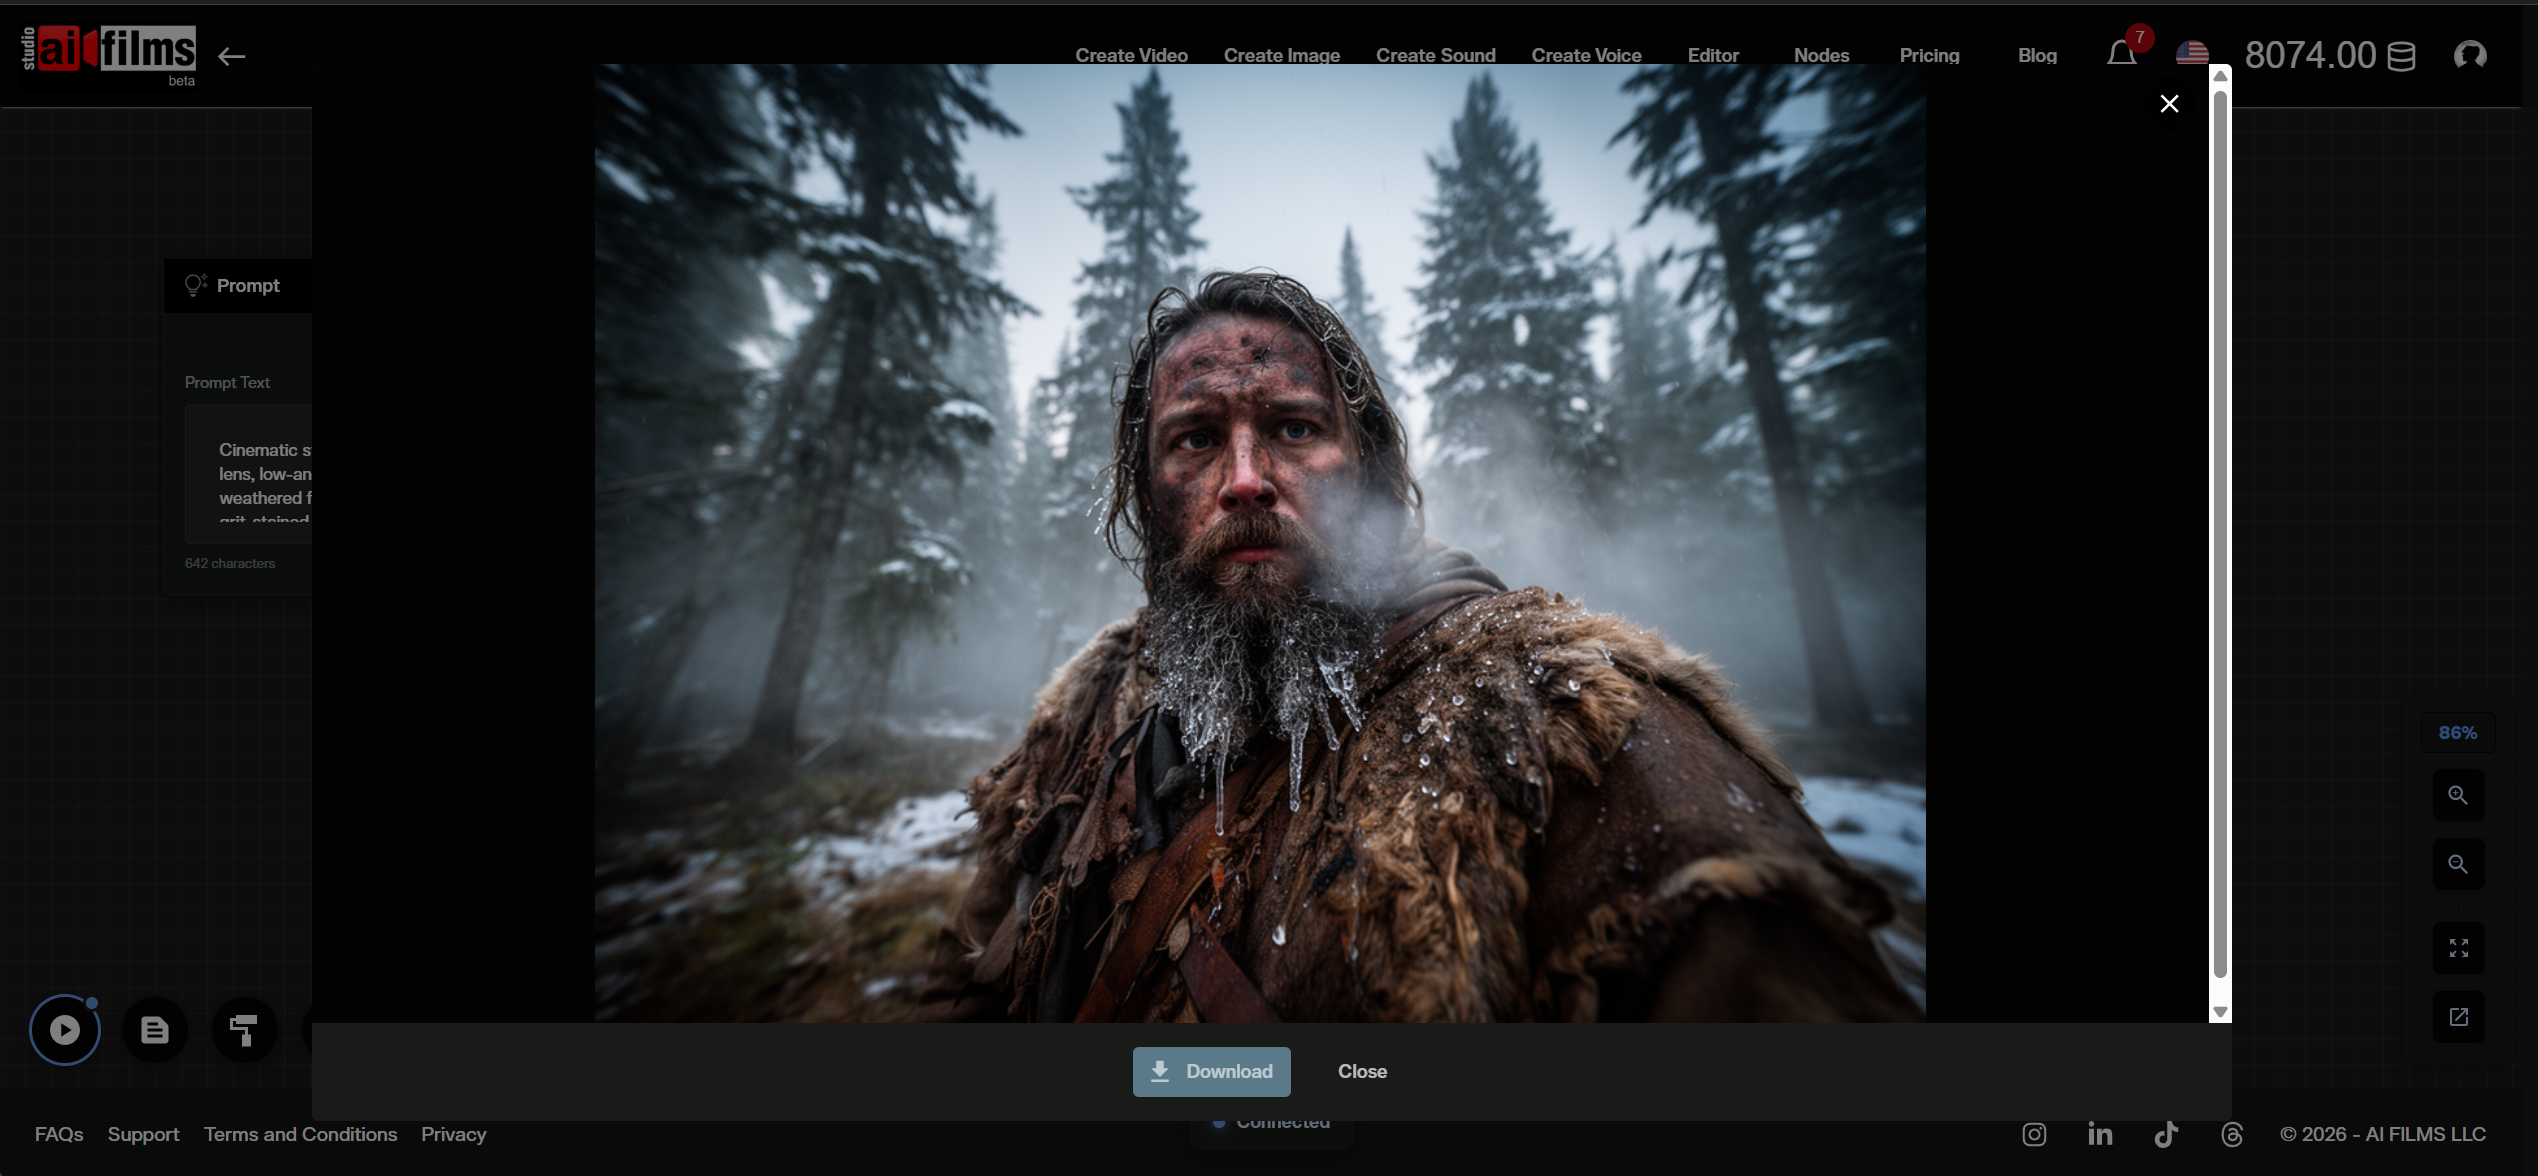
FLUX.2 Pro is Black Forest Labs' production grade text-to-image model. At 32 billion parameters, it generates photorealistic images at up to 4 megapixels with accurate text rendering and consistent character identity across multiple outputs. It requires no manual configuration: guidance scale, steps, and scheduler are handled automatically.
The model is built for high volume production where prompt adherence and visual consistency across a batch matter. AI FILMS Studio identifies the best use as rapid ideation and static movie banners.
Generate an Image
Open the image workspace and select FLUX.2 Pro from the model dropdown. Write your prompt and click Generate. The model interprets complex prompts with multiple subjects and handles typography reliably without extra parameter adjustments.
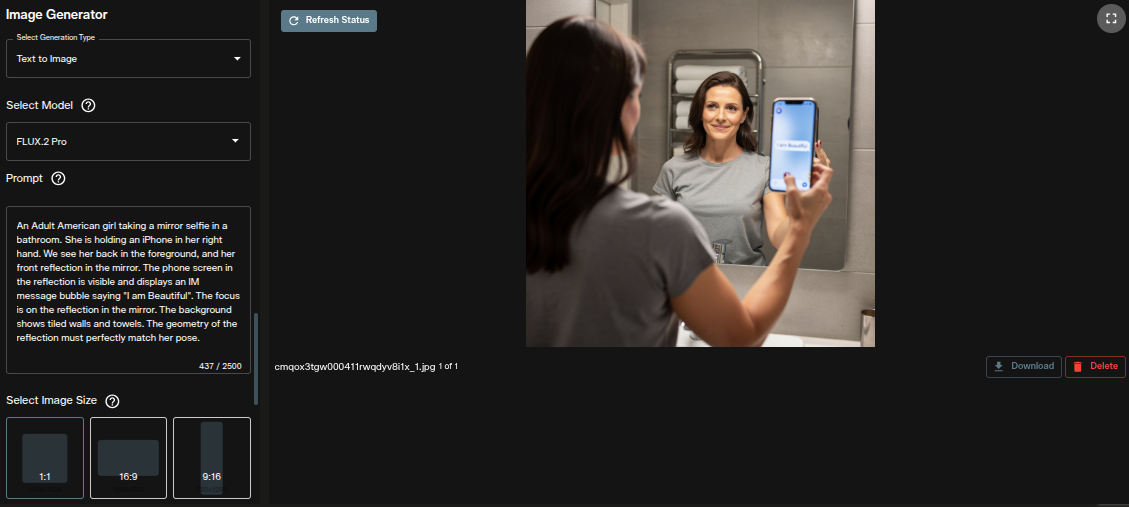
Each generated image costs 30 credits.
FLUX.2 Pro in Nodes
FLUX.2 Pro is available as a Text to Image node in the AI FILMS Studio Nodes Graph Editor. Connect a Prompt node to the FLUX.2 Pro node, then wire the output to an Image Viewer or the next node in your pipeline.
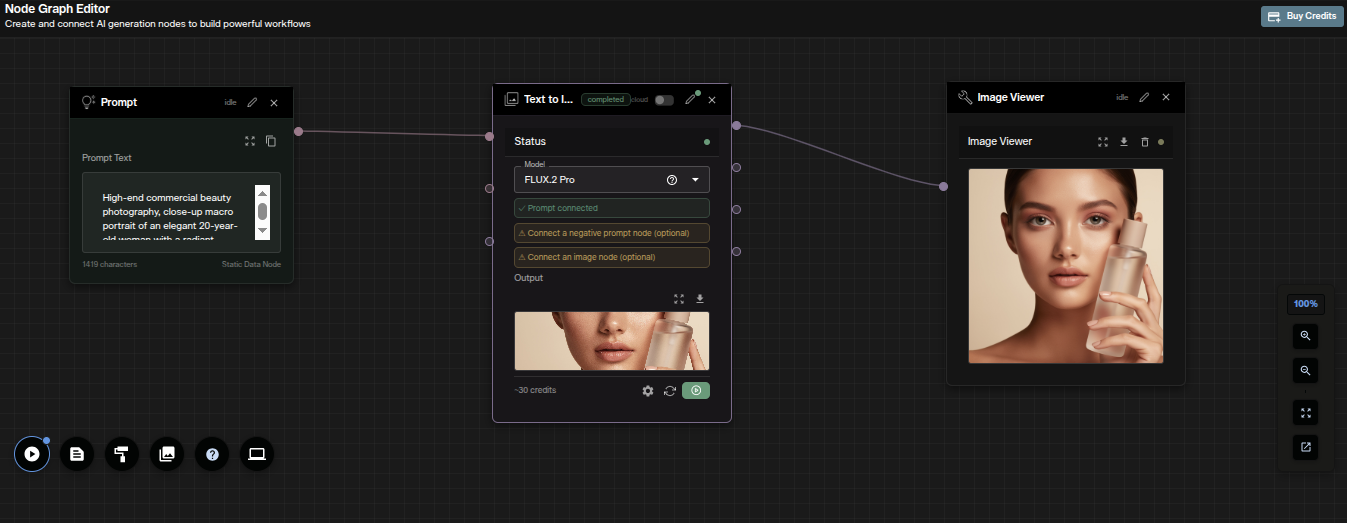
Image Editing with FLUX.2 PRO Edit
FLUX.2 PRO Edit accepts existing images and transforms them based on text instructions. It supports multi reference composition, where you can combine elements from up to 10 source images into a single output.
Step 1: Upload Your Source Image
In the image workspace, select FLUX.2 PRO Image to Image and upload your source image via the dropzone or paste a URL.
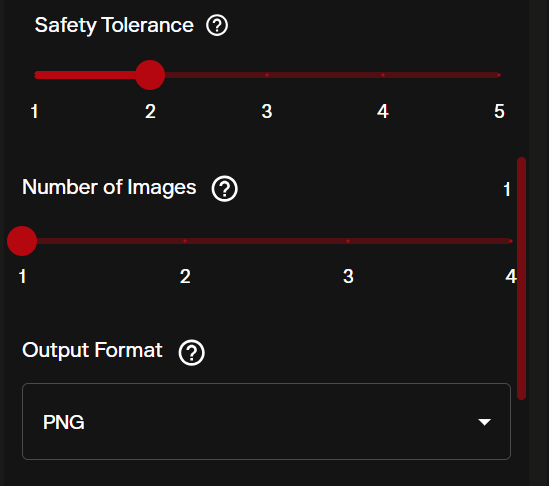
Step 2: Configure Edit Parameters
- Safety Tolerance: Scale of 1-5. Lower values (1-2) apply stricter content filtering. Higher values (4-5) allow more creative freedom. Default is 2.
- Image Size: Choose from presets (Square HD, Portrait 4:3, Landscape 16:9) or set custom dimensions up to 4096px per side. Maximum total resolution is approximately 1 megapixel.
- Guidance Scale: Default 3.5 for editing. Higher values preserve more of the original image structure.
Step 3: Write Your Edit Prompt
For single image editing, describe what you want to change:
Background Replacement:
Same subject and pose, replace the background with a sunset beach scene,
warm golden hour lighting, ocean waves in the distance
Style Transfer:
Convert this photograph to a watercolor painting style,
soft edges, visible brush strokes, muted pastel color palette,
maintain the original composition and subject positioning
Object Addition:
Add a tabby cat sitting on the desk next to the laptop,
cat looking toward camera, natural lighting consistent with existing scene
Multi Reference Editing
FLUX.2 PRO Edit supports referencing multiple uploaded images using the @image syntax. Upload several images and reference them in your prompt:
Combine the person from @image1 with the background from @image2,
using the lighting style from @image3, photorealistic result
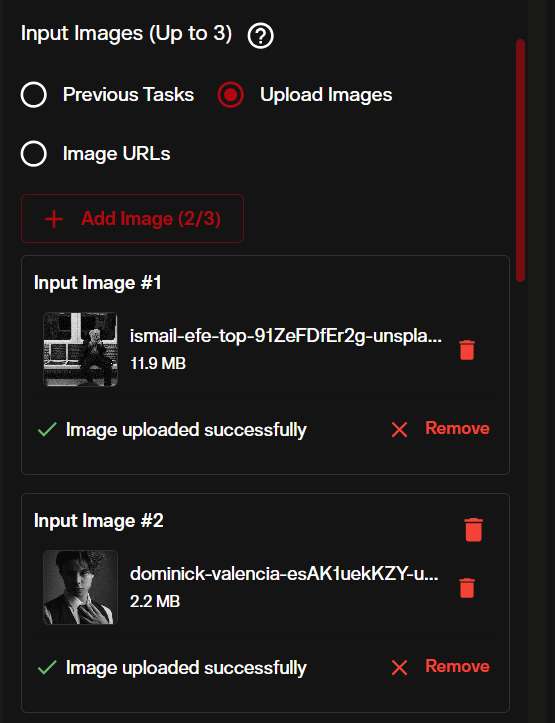
This is particularly useful for:
- Placing characters from one image into environments from another
- Applying color palettes or styles from reference images
- Compositing product shots with different backgrounds
Image Editing with FLUX.2 Klein 9B Edit
FLUX.2 Klein 9B Edit is Black Forest Labs' 9 billion parameter distilled editing model. It accepts between 1 and 3 reference images alongside a natural language instruction and outputs the edited result. The 9B parameter architecture provides stronger detail retention and prompt adherence than smaller distilled variants, at a cost of 16 credits per generated image.
Use Klein 9B Edit for compositing a subject from one image into a scene from another, applying a visual style from a reference to a different subject, and changing lighting conditions or localized elements without altering the rest of the composition.
Step 1: Open the image workspace
Go to AI FILMS Studio and select FLUX.2 Klein 9B Edit from the model dropdown.
Step 2: Upload reference images and write your instruction
Upload 1 to 3 images. When working with more than one, reference them by position in your instruction: "image1", "image2", and so on.
Write a precise instruction describing the change. For compositing: "Place the person from image1 into the scene in image2 with consistent lighting." For style transfer: "Apply the watercolor style from image1 to the subject in image2."
Step 3: Generate and review
The model produces the edited output. Use a seed value to reproduce a specific result or run controlled variations across the same instruction.
FLUX.2 Klein 9B Edit in Nodes
Klein 9B Edit is available as an Image to Image node in the AI FILMS Studio Nodes Graph Editor. Connect an Image from Task node and a Prompt node to the Klein 9B Edit node to automate editing steps inside a larger pipeline.
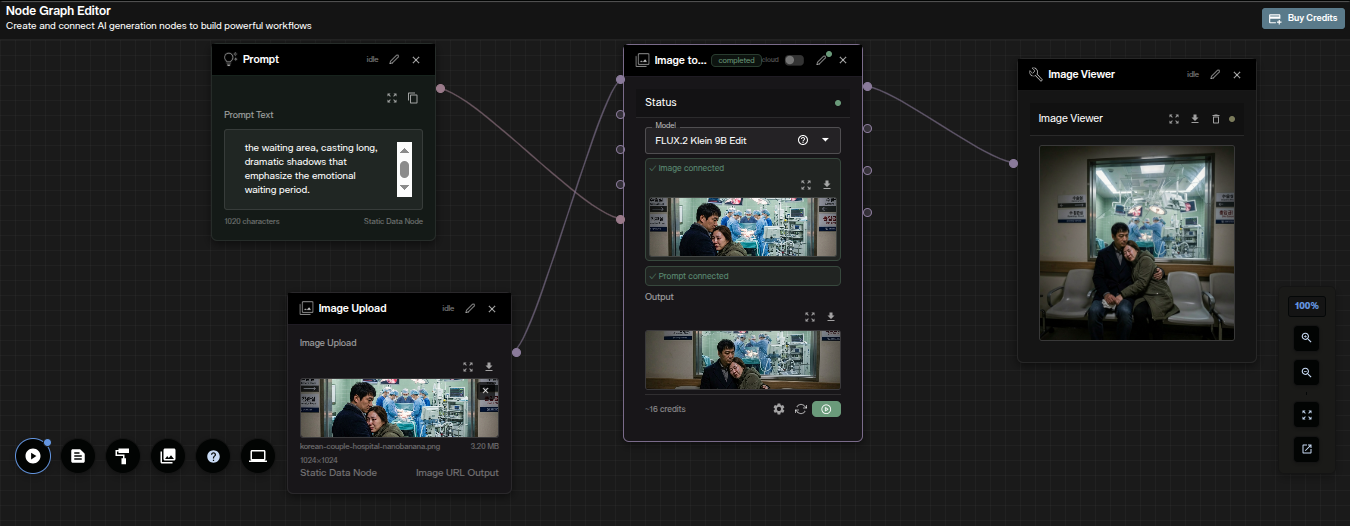
Image Editing with FLUX.1 Kontext Max
Kontext Max specializes in contextual image editing with broad aspect ratio support including ultrawide (21:9) and ultra tall (9:21).
Supported Aspect Ratios
1:1, 4:3, 3:4, 2:3, 3:2, 16:9, 9:16, 21:9, 9:21
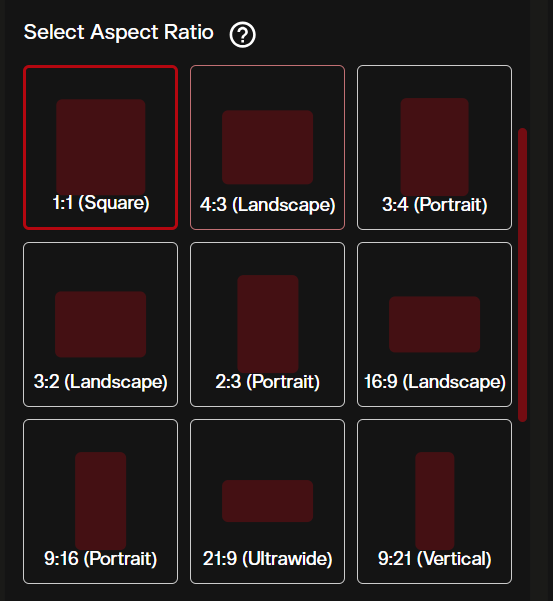
This makes Kontext Max ideal for:
- Social media assets across platforms (Instagram square, Stories vertical, YouTube thumbnail landscape)
- Ultrawide cinematic compositions
- Vertical poster and banner layouts
Prompt Examples
Relight a Scene:
Change the lighting to dramatic blue neon, maintain all subjects and composition,
add volumetric haze, cyberpunk atmosphere
Change Season:
Transform the outdoor scene to winter, add snow covering the ground and trees,
overcast sky, breath visible in cold air, maintain same camera angle
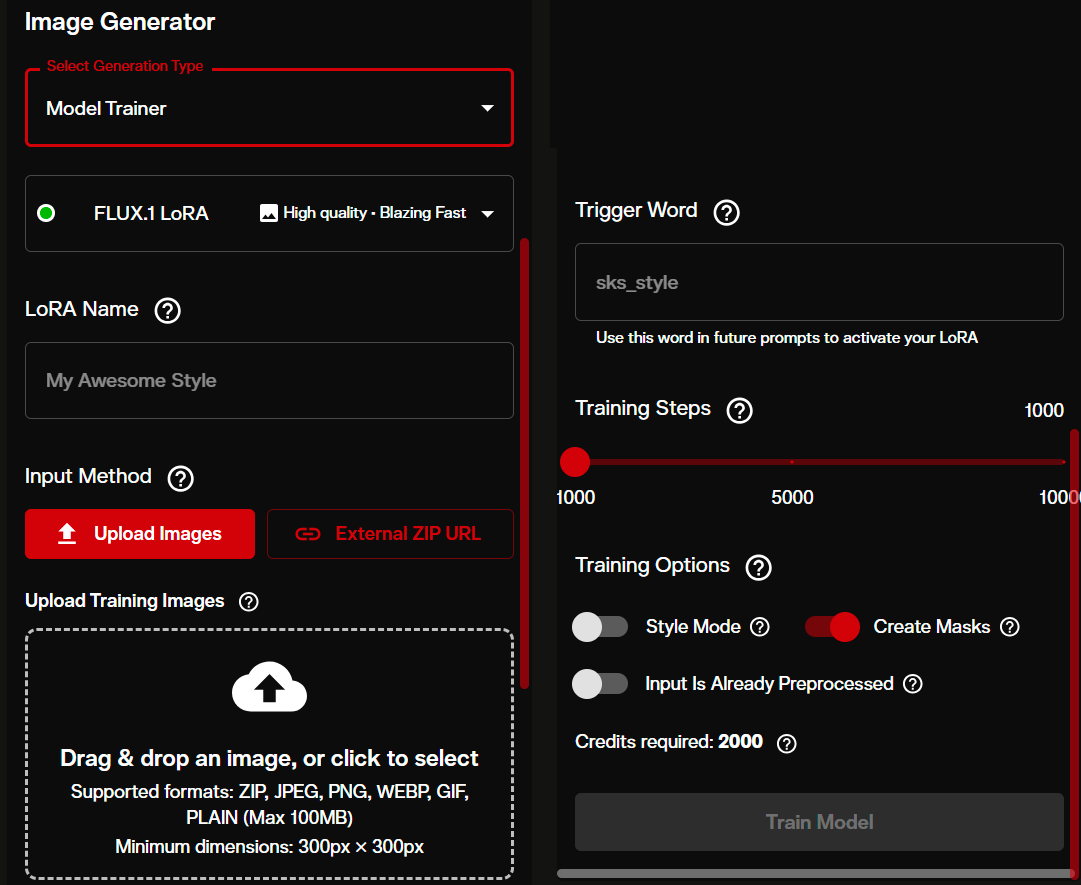
Custom LoRA Training with FLUX.1
LoRA (Low Rank Adaptation) lets you fine tune FLUX to generate images in a specific style, of a specific character, or matching a particular visual identity. AI FILMS Studio provides the FLUX.1 LoRA Fast Trainer directly in the workspace.
Step 1: Prepare Training Images
- Collect 10-30 images representing your target style or subject.
- Use consistent quality. Higher resolution training images produce better results.
- For character training, include varied angles, expressions, and lighting.
- For style training, include diverse subjects in that style.
- Supported formats: JPG, PNG, WebP, GIF, or a ZIP archive.
- Maximum 100MB per file.
Step 2: Configure Training
Navigate to the training section in the image workspace and set:
- LoRA Name: A descriptive name (3-40 characters). Example: "noir-portrait-style"
- Trigger Word: The keyword that activates your LoRA during generation (2-30 characters). Example: "noirstyle"
- Training Steps: 1,000 to 10,000. More steps improve accuracy but cost more credits.
- 1,000 steps: Quick training, basic style capture
- 5,000 steps: Balanced quality for most use cases
- 10,000 steps: Maximum accuracy for complex subjects
- Style Mode: Enable for artistic styles. Disable for specific characters or objects.
- Create Masks: Auto segments training subjects from backgrounds. Disabled when Style Mode is on.
Step 3: Use Your Trained LoRA
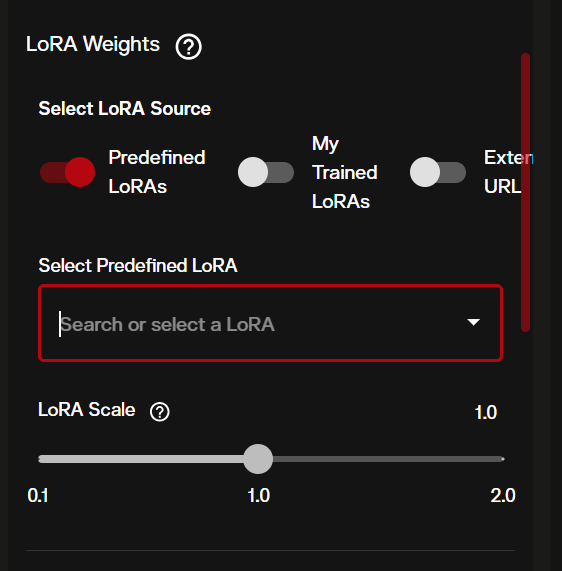
After training completes, select FLUX.1 LoRA Text to Image from the model dropdown. Your trained LoRA appears in the LoRA selection panel.
- LoRA Scale: Controls the strength of your fine tuning. Default is 1.0. Range is 0.1 to 2.0.
- 0.3-0.5: Subtle influence, blended with base FLUX style
- 0.8-1.0: Standard application
- 1.5-2.0: Strong override, may reduce diversity
Use your trigger word in the prompt:
noirstyle portrait of a detective in a dark office,
venetian blinds casting shadow stripes across the face,
cigarette smoke curling upward, black and white
You can also stack multiple LoRAs or combine your trained LoRA with predefined ones like "90s-anime-art" or "flux-RealismLora" available on the platform.
Building FLUX Workflows with Nodes
The node graph editor lets you chain FLUX models with other AI tools in automated pipelines. FLUX integrates with two node types:
- Text to Image Node: Uses NanoBanana or Seedream by default, but generates images from text prompts that can feed into video, enhancement, or editing nodes.
- Image to Image Node: Uses NanoBanana Edit or Seedream Edit by default, takes an existing image and transforms it.
Example Pipeline: Image to Narrated Video
- Prompt Node -> Write your scene description
- Text to Image Node -> Generate a still frame
- Image to Video Node -> Animate the frame with Google Veo 3.0 or Seedance
- Text to Speech Node -> Generate narration audio
- Text to Video Lipsync Node -> Sync speech to character in video
- Result Node -> Collect final output
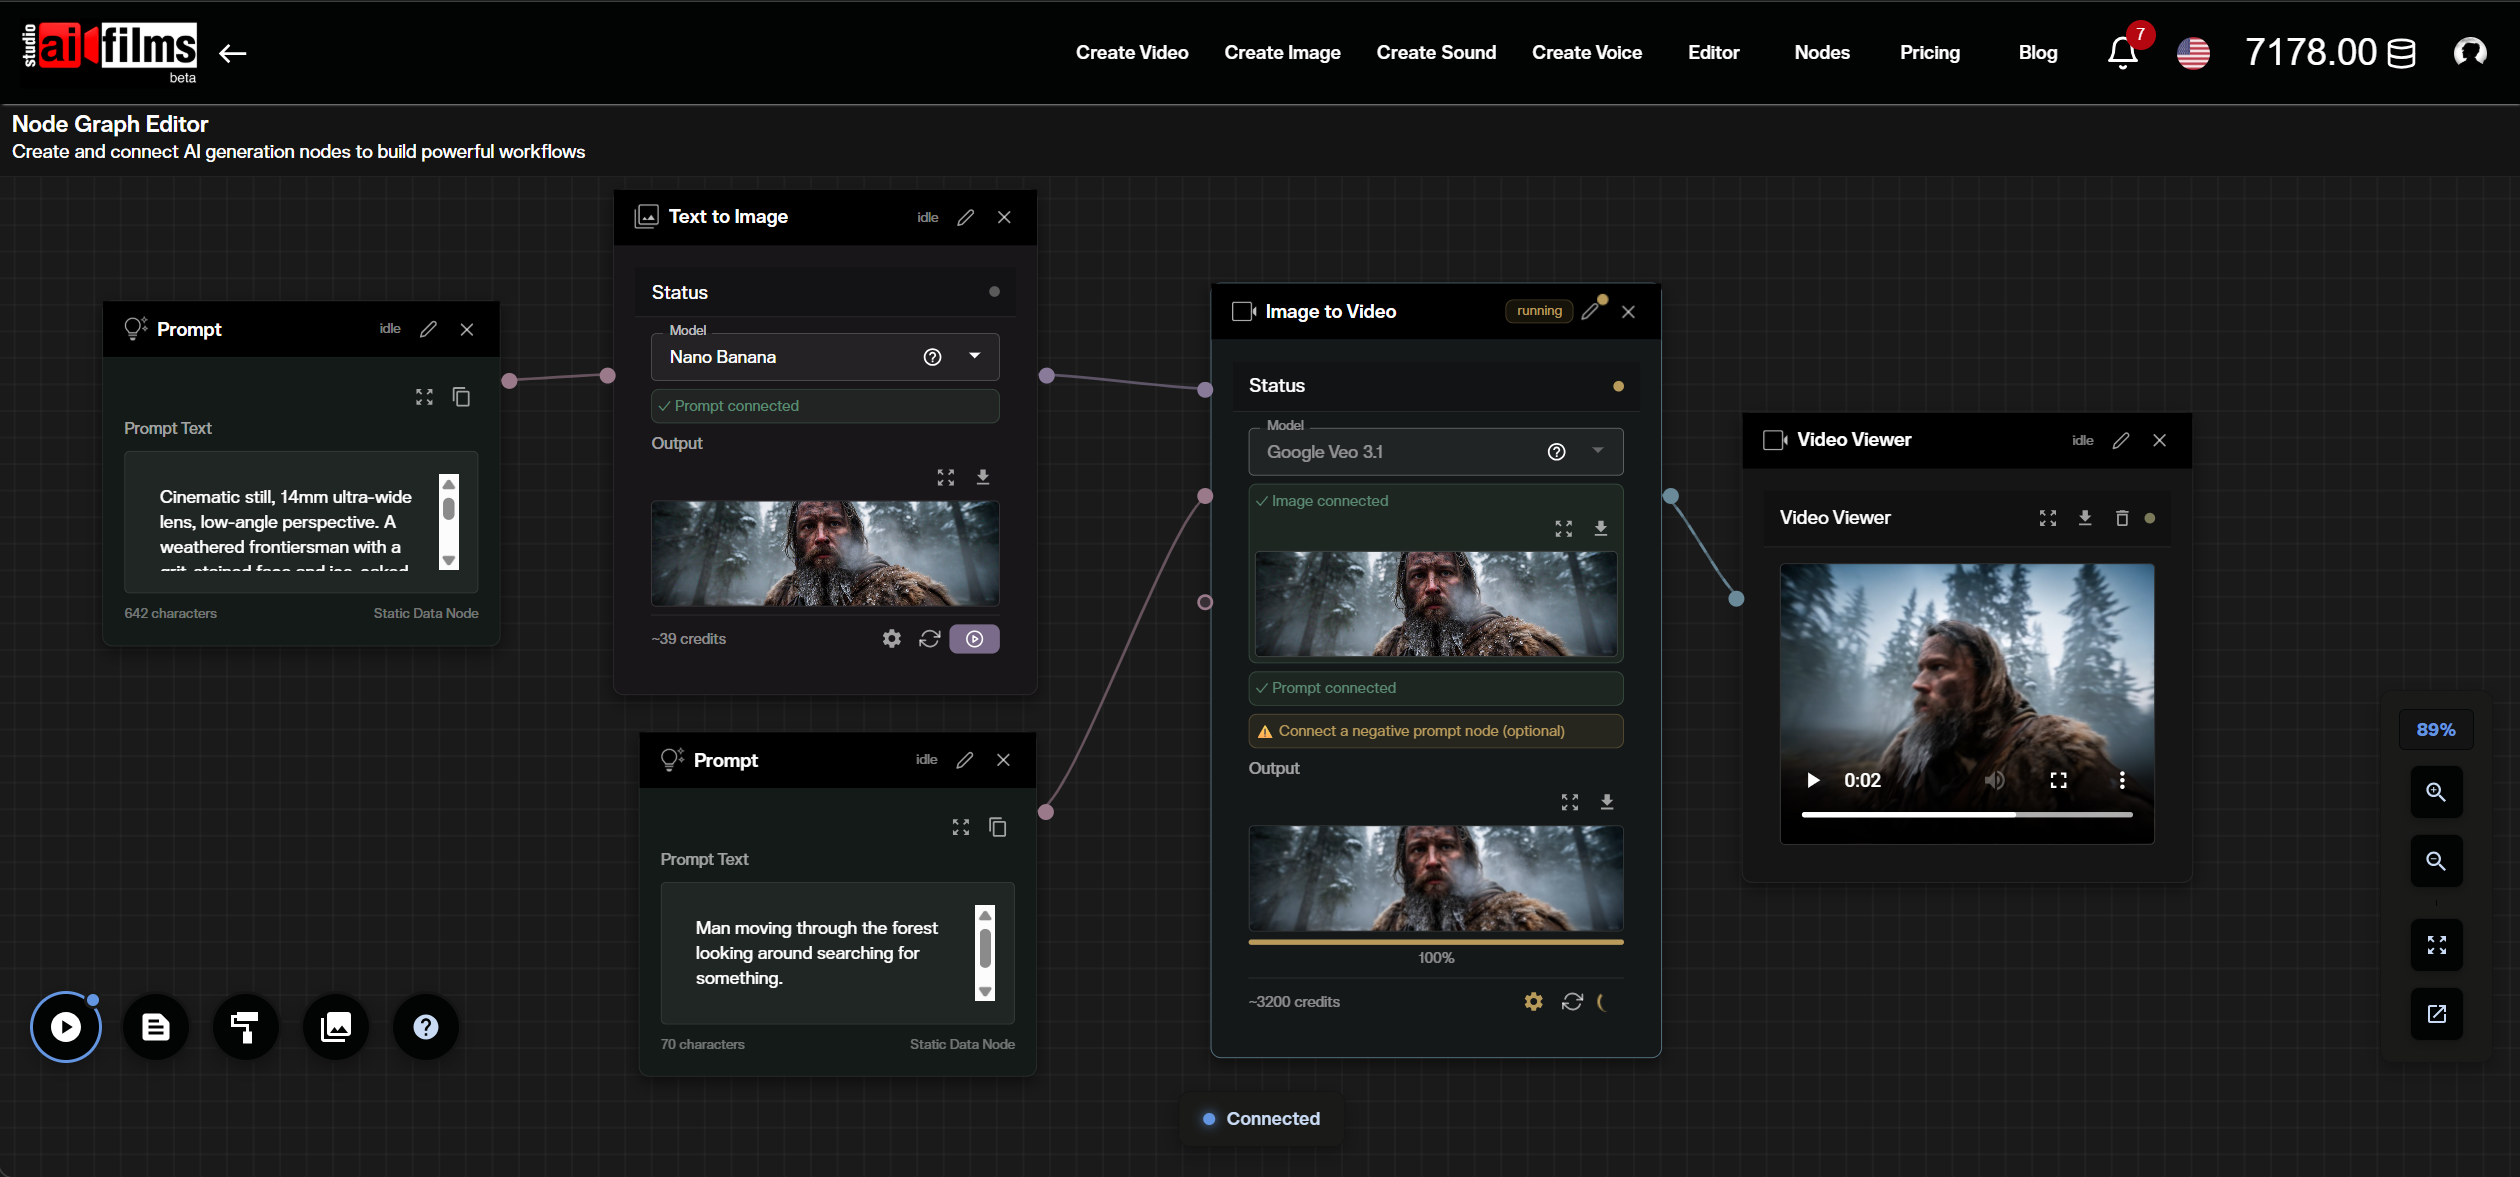
This pipeline costs approximately 490 credits per run (50 for image + 300 for video + 0 for speech + 140 for lipsync + 0 for nodes).
Example Pipeline: Batch Style Transfer
- Image Upload Node -> Upload source image
- Image to Image Node -> Apply style transformation
- Image Enhancer Node -> Upscale with SeedVR
- Result Node -> Download enhanced output
Each pipeline runs automatically. Connect node outputs to inputs by dragging between ports. The system validates connections and prevents circular dependencies.
Prompt Engineering for FLUX Models
FLUX responds best to structured, descriptive prompts. Here are patterns that produce consistent results.
Structure Your Prompts
Follow this order for reliable outputs:
- Subject: Who or what is in the image
- Action/Pose: What the subject is doing
- Setting: Where the scene takes place
- Lighting: Light source, quality, and color
- Camera: Lens, angle, distance
- Style: Artistic style or reference
- Technical: Resolution, format, specific details
Use Hex Colors for Brand Accuracy
FLUX supports exact color specification:
Corporate headshot with background in exact color #003366,
subject wearing white shirt, professional studio lighting
Negative Prompts
All FLUX text-to-image models support negative prompts. Use them to exclude unwanted elements:
Negative: blurry, low quality, distorted hands, extra fingers,
watermark, signature, text overlay, cropped
Text in Images
FLUX handles typography reliably. Specify text content, placement, and styling:
Movie poster with title "MIDNIGHT SIGNAL" in bold sans-serif font at top,
tagline "The truth was never silent" in smaller italic text below,
dark moody cityscape background, film grain texture
Choosing the Right FLUX Model
| Scenario | Recommended Model | Why |
|---|---|---|
| Final production image | FLUX.1.1 PRO Ultra | Highest quality, full parameter control |
| Static banners and marketing art | FLUX.2 Pro | Automatic parameter optimization, up to 4MP |
| Quick concept drafts | FLUX.2 Dev (High acceleration) | Fastest generation with prompt expansion |
| Fast image editing from references | FLUX.2 Klein 9B Edit | 9B distilled model, 16 credits per image |
| Edit an existing photo | FLUX.2 PRO Edit | Multi reference support, safety controls |
| Consistent brand assets | FLUX.1 LoRA (with trained weights) | Custom style locked to your brand |
| Social media assets | FLUX.1 Kontext Max | Widest aspect ratio support (21:9 to 9:21) |
| Style exploration | FLUX.2 Dev (No acceleration) | Latest architecture, 50 step max for detail |
For video generation from FLUX images, pair your outputs with AI FILMS Studio's video models like Google Veo 3.1 or Kling v2.6 through the image-to-video workflow.
FAQ
What resolution can FLUX generate? FLUX.2 PRO Edit supports up to 4096 pixels per dimension with a total maximum of approximately 1 megapixel. FLUX.1.1 PRO Ultra generates up to 4 megapixel images. Custom dimensions are available on all variants.
How many images can I generate per request? All FLUX models on AI FILMS Studio support 1 to 4 images per generation request.
Can I use FLUX for commercial projects? Yes. FLUX models accessed through AI FILMS Studio are licensed for commercial use through the platform's subscription. You do not need a separate license from Black Forest Labs.
How much do FLUX generations cost? FLUX.2 Pro costs 30 credits per image. FLUX.2 Klein 9B Edit costs 16 credits per image. Other model rates vary. Check the pricing page for current rates. LoRA training costs scale with the number of training steps selected.
Can I combine FLUX with video generation? Yes. Generate an image with any FLUX model, then use it as input for image-to-video models like Google Veo 3.0, Seedance, or Kling through the video workspace or the node graph editor.
For a deeper look at the technical architecture behind FLUX.2, see our FLUX.2 release analysis.
Sources
Black Forest Labs: "FLUX.2: Frontier Visual Intelligence" Published: November 25, 2025 https://bfl.ai/models/flux-2
Continue Reading


Video & LipSync
- Video Generator
- Text to Video
- Image to Video
- Start-End Frame to Video
- Draw to Video
- Motion Control
- Video Enhancer
- Video Upscaler
- Video to Video LipSync
- Audio to Video LipSync
- Image to Video LipSync
- Video FaceSwap
- Seedance 2
- Vidu Q3 Pro
- Gemini Omni
- Google Veo 3.1
- Kling 3.0 Pro
- Luma Ray 3.2
- LTX 2.3
- Happy Horse 1.1
- Kling 3.0 Motion
- ByteDance Upscaler
- InfiniteTalk
- InsightFace